S is for Sakura

Sakura, 桜, Japanese cherry blossom

Few things are as aesthetically emblematic of Japan as the sakura blossom. It’s an easy visual shorthand in movies and anime for spring, new love, and youthful exuberance. All for good reason. They bloom in profusion across the entire country, a season as looked forward to as the holiday season here in North America. The blooming of the sakura trees is celebrated on coins, with parties, by time-limited merchandise, clothing, picnics, drinks at Starbucks, you name it.

They are a perfect example of mono no aware, or the acceptance of the transience of life. They burst open in a cloud of soft colour and last mere days.

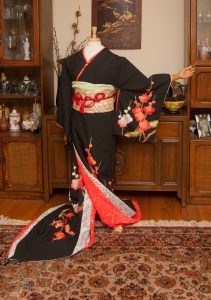
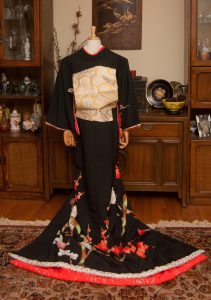
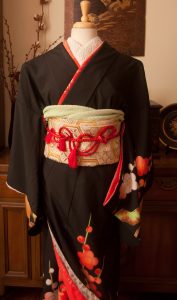
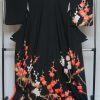
When it comes to kimono, sakura can be depicted many ways. However, there are some constants that make it easy to identify. Sakura will always have five petals in the central or main layer, and each petal is slightly elongated with a tell-tale notch in the tip.

Traditionally, sakura is a spring motif, worn right before the real ones bloom. However, it’s become such a ubiquitous design that it shows up in all seasons nowadays. Unless you’re going to a very strict event, I believe you can wear it any time.

Here are some examples taken from my collection, so you can see the variations and similarities.

All the photos in this entry come directly from my collection. You are welcome to use them for personal projects and reference, but not for anything commercial. If you’re uncertain, feel free to contact me.

R is for Rinzu

Rinzu, 綸子, silk damask

Rinzu is like jacquard, a beautiful tone-on-tone pattern achieved by weaving techniques only. No dye, no paint, just right off the loom with a rich, beautiful depth.

I have lots of pieces in my collection that have a rinzu base, but none of them show off and exemplify them quite as gorgeously as this vintage purple iromuji given to me by a friend. I decided to do an entire outfit (or as much as possible) using only solid pieces with bold rinzu fabric.

Aside from the utterly lush purple kimono, I used the mofuku obi I painted a while back, since you can still see the lovely water pattern in the black fabric. The obiage is a soft pink that ties in well with the obi, with a rinzu design of sakura and geometric lines. I tied it in a little bow for more sweetness and softness. I’m honestly not sure if the haneri counts as rinzu, the weave is much more textured and raised than anything else I own. But the design is woven, not painted or embroidered, so I ran with it. As for the obijime, the only rinzu one I own is an all-black mofuku piece, which felt too heavy against the black obi so I just went with a soft pink round braid.
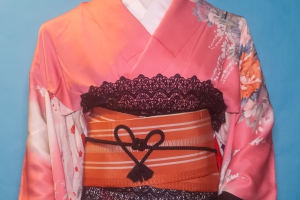
The outfit is quite simple, but I think it does a fantastic job of showing off all the gorgeous woven design and texture that is rinzu silk!

Items used in this coordination

Q is for Quilting

Quilting, the process of sewing two or more layers of fabric together to make a thicker padded material


Q, much like last week’s letter L, is a letter that has no equivalent kana or phoneme in Japanese. Typically, Q-words that are transliterated from other language end up being written with a K-based kana. For example – my last name, Quintal, would become クインタル, or Ku-in-ta-ru. I don’t mind it!

However, it did make finding a topic for today’s entry a little difficult. It took me a while but then it hit me; sashiko is a form of quilting. I thought I’d share a larger project I finished a while back. It’s a beautiful pattern, a collage of kamon, or family crests, designed by Susan Briscoe.

I haven’t gotten around to edging it yet but it will eventually be a wall-hanging, possibly double-sided. I haven’t figured out the details yet. I love sashiko stitching because it’s technically such a simple thing, but the results are so striking, especially when it’s done with white thread on dark indigo fabric like this. I love that it’s often used as a very practical, utilitarian handicraft, reinforcing fabric and adding weight and heft for warmth. And yet, it’s so beautifully decorative!

If you’re interested in doing this panel yourself, it’s available directly from the artist who designed it, Susan Briscoe.

P is for Patapata

Patapata, パタパタ, onomatopoeia of “fluttering wings”

Ever since I saw this tutorial for an adorable patapata musubi with a bow accent, I knew I wanted to try it. I kept procrastinating for some reason, but now I’m glad I did because that means today I can show you this perfectly puffy pink patapata coordination! Japanese is a language full of adorable onomatopoeia, and patapata represents the fluttering sound made by bird or butterfly wings, and looking at the soft blousy folds it’s easy to see where the name came from.

I used the pink bubble side of my adorable whale obi, along with a sweet multi-floral black komon kimono. The outfit felt a little too boring as-is, so I pulled out a bright pink haneri and lace shawl to complete the look while making sure nothing distracted from the adorable obi bow.

If you’d like to learn to tie patapata musubi yourself, here is the video I followed! I love Sunao’s videos, they’re very clear and the English subtitles are very well-written.

Items used in this coordination

O is for Orizuru

Orizuru, 折鶴, origami (lit. folded) crane

I’m feeling somewhat under the weather again today, I’m afraid. I was going to create a coordinate using some pieces in my collection with the origami crane motif but I’m just not up to it.

Instead, I thought I would share some quick and easy instructions for a really charming little mobile. This piece was made over a year ago and I never thought to take photos of the process, but I promise it’s incredibly simple.

I had the cranes already; a couple I made myself but the bulk of them were included in packages from friends or as little gifts with kimono purchases. I really wanted a way to show them off, rather than have them all languishing in drawers.

All I did was carefully pierce holes through the centre of the body of each crane and feed through some very fine beading wire, I used a small jewellery crimp beneath each one so they wouldn’t slide down to the bottom of the wire, and interspersed a few tiny orgami lucky stars for some visual interest.

I made several strands of varying lengths, and attached them to the solid piece from an embroidery hoop set, again using the crimps to fix the wires in place. Another wire to form a hanging loop and voila, your own pretty little flock of orizuru!

 This post contains affiliate link(s). If you choose to purchase, I receive a small rebate or commission which goes to the continued maintenance of this site.