Giving an old obi new life

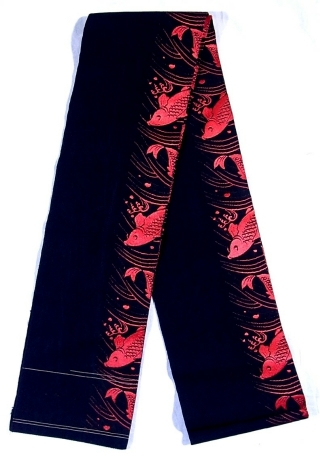
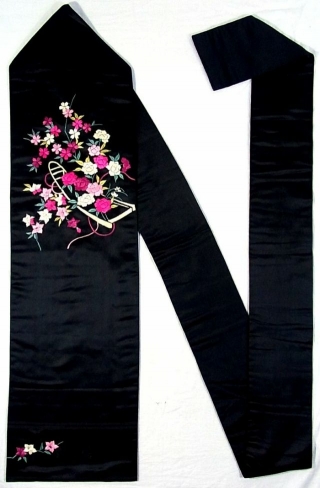
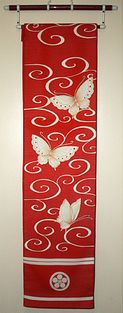
When I first started this blog, I posted about my amazing crow obi, and mentioned that the silk backing had rotted out due to age, and I had plans to replace it.

Fast forward um, a year and a bit, and my procrastinating self has finally accomplished something! The obi fabric and original lining had been sitting folded in a bag for quite a while and I decided it was high time to finally give it the respect it deserves. If you’ve ever been curious about the construction of an obi, or have an obi yourself that needs to be redone, please read on!

The first step was to separate the obi silk from the obi-shin (stiffening core). They were not sewn together, but have been stuck to each other for what may be nearly a century at this point, so this involved a bit of careful peeling apart.

Isn’t my kitty ironing board cute? You’ll be seeing an awful lot of it in this entry XD

Once the two pieces were separated, I carefully ironed the seam allowance of the obi silk open. I ironed it enough to make the piece lie flat, but left the original fold line visible so I would have a straight line to sew along later without having to mark up the fabric.

Here is the whole piece with the seam allowance ironed flat. You can see how much the colour has faded over the years, but since the allowance will be hidden this isn’t really a problem. I just thought it was interesting and worth sharing.

The next step was to pin the wrong sides together of the obi silk and the black satin I was using for a backing piece. This was exceptionally tedious and I pricked my fingers several times!

Here’s the entire thing pinned together and taking up too much space on my floor. Yes, there is a disgusting area rug on top of disgusting wall-to-wall carpet on my basement. The floor gets cold so I’d rather icky and comfortable over stylish but clammy!

Once everything was pinned together, the next logical step was sewing. Lots and lots and lots of sewing. Due to the fragile nature of the silk and the fact that the obi gets tugged and pulled a lot, this all had to be done by hand, in a closely-spaced but loose slip stitch. I saved a huge amount of time by doing Japanese-style hand-stitching. This is hard to explain, but it basically involves holding the needle still and rocking the thread back and forth until a handful of stitches are lined up on the needle, and then pulling it through. This video gives an amazing visual demonstration with no explanation needed. Once you get the hang of sewing like this, it is an enormous time-saver.

Once both long sides are completely sewn, I ironed the seam allowances down again so it would lie flat. I found it easiest to do one fabric and then the other, rather than trying to press both sides at the same time.

Once the outer parts of the obi were sewn together, I folded them carefully, put them aside, and got to work on the shin (core). An obi is constructed somewhat like a sandwich, with the two visible pieces of silk on the outside, like the “bread”, and the shin in the centre, like a filling. The shin is usually a piece of heavy cloth, sometimes flannel, sometimes duck-cloth, and it serves to give body and stiffness to the obi. Without the shin, the obi would not lie flat and smooth when wrapped and tied around the body. If you’ve ever seen a cosplayer with a really crumpled, lumpy obi that has sort of collapsed on itself over the course of the day, odds are they made themselves an obi without using any sort of a shin or core.

The obi had a shin inside of it, a sort of brushed flannel-y material, but it had gotten incredibly soft over the years, so I decided to reinforce it. I found a roll of obi-shin fabric on eBay, but if you can’t find one specifically, any thicker fabric with a bit of body will work. Because the fabric of the obi itself is so thin, I figured a bit of extra stiffness would be good and used both the old shin and the new one together.

I used the old shin to determine the size of the new one. After I’d folded it to match the size of the old piece, I pinned it down and ironed it flat so it would stay in shape.

I pinned both shin together temporarily, just to make them easier to deal with and prevent things from shifting around while I worked.

With the two pieces pinned together, it was much easier to lay them out and tuck them into the folded seam allowances of the obi lining. Thankfully, I had assistance in the form of a Tribble. And yes, that is her tongue sticking out in the large version. For a mutt-cat, she is incredibly brachycephalic and tends to leave her tongue hanging out a bit because it doesn’t fit in her mouth properly. Poor boo.

Once all the pieces were sandwiched together inside-out, the next step was to turn the whole thing right-side-out. First step was to remove all the pins to make sure none got trapped inside when I was done. Unfortunately I do not have any photos of this phase, because both my arms were very busy and my father was helping me. I will do my best to explain how we did it. I held the end open while he reached inside and carefully pinched all four layers and pulled them outwards through the other end. If you’ve ever cased a sausage, it was a similar procedure. After it was properly turned, I used some delicate fabrics hemming tape to shut the ends. I could have sewn it, but I’ve used the hemming tape before and was pleased with how gentle and permanent the results were so I figured I’d save a little time.

And here she is, finally finished! I’m very proud that I actually finished this, and am very pleased with the results.

Knowledge: Types of Kimono

Kimono can be an overwhelming thing to get into, especially since there are so many different types of kimono. To the beginner, they may all look similar, but a basic knowledge of the types of kimono and appropriate situations for wear is always handy. I have explained this very slightly in the Kimono Terms Glossary but in this entry I will elaborate further, with photo examples, and suggestions on where to wear each type. I will be doing a similar entry about obi shortly, which will help elaborate on the types of obi mentioned in this entry. (edit: Here is the corresponding entry about obi)

Do keep in mind that as with anything in life, there are always exceptions to the rule. There exist many types of hybrid or unique kimono that can be a combination of one or more of these styles. These are the most common and standard acknowledged varieties of kimono, but if you find one that doesn’t easily fit into one of these categories, that does not necessarily mean it’s not a true kimono.

Yukata
These are the most casual and probably the most comfortable to wear. They are made of cotton and generally have fun, vibrant, all-over prints. In Japan, very casual yukata are worn in ryokan (traditional hotels), onsens (public bath houses), and around the house. These typically are white with a simple indigo print, and are usually short enough not to drag on the floor. Yukata intended for festivals are often longer, and folded at the waist, and made of a more substantial cotton with brighter and more detailed prints. These types are a great place for beginners to get into the hobby, as they are fun, funky, and require the least amount of accessories – all you need is an undershirt, bike shorts, a few cotton ties, and a narrow obi. You can wear them to festivals, fireworks, picnics, barbeques, or any other fun summer activity. Imagine anywhere you’d wear jeans and a cute t-shirt or a casual cotton sundress. Appropriate obi to wear include hanhaba (hira) obi or heko obi.
Komon
Komon are the most casual level of “real” kimono. They are characterized by all-over patterns that can be either large or small in scale. They are typically quite informal, but can be made slightly more formal with small bits of metallic print or embroidery and in a pinch can be dressed up with a slightly nicer obi. However, they’re still the most casual of kimono. Appropriate situations for wear include lunch with friends, shopping in a high-end district, a trip to a museum. Similar to a nice pair of slacks or a day dress. Komon can be paired up with a variety of obi, including nicer hanhaba obi and nagoya obi. If the kimono is quite dressy or the obi is quite casual certain fukuro obi might work, but this is rare and safer to avoid if you’re unfamiliar or uncomfortable with the rules.
Iromuji
By far the most versatile kimono in any woman’s wardrobe – think of iromuji as the “Little Black Dress” in your closet. With the right accessories they can go from running errands to a tea ceremony to the opera to the wedding of a friend. These kimono are one solid colour, but often made of very textural rinzu silk, which is woven in such a way as to have a tone-on-tone pattern. Patterns can include flowers, plants, textures, landscapes, really the possibilities are endless. Iromuji can also come with one, three, or five family crests – one crest is by far the most common. The more crests a kimono has, the more formal it becomes. A one-crested iromuji is probably the best investment you will ever make if you plan to wear kimono frequently. Due to the versatility of the kimono, many types of obi are appropriate, depending on the situation and formality. Anything from a dressy hanhaba obi, to nagoya, to fukuro are all acceptable.
Tsukesage
Tsukesage are generally a solid colour with designs in a few very specific locations – along the hem, the front panel, the sleeve, the shoulder, and the collar. They can be quite vibrant or relatively subdued, and work in a variety of situations. Dinners out, trips to the theatre. They’re good for when you want to dress up a bit and stand out, but not very formal events. Tsukesage do not come with crests, so they are not particularly appropriate for ceremonial events. Suitable obi are nagoya, and fukuro if the kimono has enough dressy elements.
Houmongi
Similar to tsukesage, but slightly more formal. Rather than having separate design elements on each panel, there is a continuous design across the entire hem and generally across the shoulders. They can also have one crest on the back, which further helps to make them a bit dressier. Houmongi are often worn to weddings, especially fancier ones in large reception halls or hotels. To me, the houmongi is the “quintessential kimono”, the kind most people picture a woman in a lovely kimono, or the kind often bought to hang on walls as art. The best obi for houmongi is usually fukuro or fukuro-nagoya, but maru obi and certain nagoya can work well too.
Furisode
Furisode actually refers to sleeve length, rather than the pattern layout. “Sode” means sleeve and “furi” means swinging. Furisode have very long, swinging sleeves. They are generally worn by young, unmarried women. Furisode can come in different pattern layouts; komon, houmongi-style, and even iromuji style. They also come in several sleeve lengths; ko-furisode – which are the shortest and can be worn almost like regular kimono, chuu-furisode (also listed as chuburisode) – which are slightly longer and generally a bit more formal, and ooburisode – the longest and generally the most formal. Kimono worn for coming-of-age day, weddings, etc, have ooburisode sleeves. Furisode also typically require fancy obi musubi (obi knots) to balance the volume and style of the sleeves, so the only proper obi to be worn with them in normal settings are fukuro or maru obi.
Irotomesode
Iro means colour, and tome-sode means short sleeves, so logically iro-tomesode would be a coloured, short-sleeved kimono. Design-wise, they have a fairly ornate continuous pattern around the hem, and nothing above the waist. They are often crested, anywhere from one to five crests, and are worn by both married and unmarried women for formal or ceremonial events. They’re not as common as they used to be, and the ones that end up on the market most often are vintage. Acceptable obi would be fukuro or maru.
Kurotomesode
Similar to irotomesode, but black. These are the most formal kimono for married women. They are worn by the mothers of the bride and groom at weddings, black-tie events, children’s graduation, etc. They are appropriate for anything celebratory or ceremonial. They show up on the secondary market quite frequently, because in modern times they are one of the most often-used kimono, as women tend to only wear them now for “big” events. Appropriate obi are fukuro or maru with celebratory motifs, usually with plenty of gold.
Kakeshita, also Hanayome
These are unique wedding kimono. They are meant to be worn trailing (see hikizuri, below) by a bride at her wedding. The overall wedding ensemble is very specialized and complicated, with many significant accessories and a specific dressing style. There are licensed salons and studios in Japan that deal solely in dressing brides for their weddings. The designs are typically very vibrant and colourful, and often have lots of flowers and cranes or other celebratory motifs. They will also generally have a lot of gold foil or couching (outline embroidery).
Uchikake
Uchikake are not what people generally think of as a kimono, they are not worn over an underrobe and tied shut with an obi. They are part of a traditional bridal ensembled, and worn trailing over the rest of the ensemble, including the kakeshita and the obi. They are more like very elaborate over-robes, and although historically they were common for the upper class and nobility, they not something that are worn in modern day in any other circumstances (aside from theatre performance). However, they do look stunning when hung on a rod as a decorative accent in the right decor.
Mofuku
Mofuku is mourning wear. This is a kimono (and obi) of solid black, worn by the family of the deceased at a funeral. A mofuku kimono will be solid black with a white lining and five white crests. These often turn up on the secondary market, but I personally believe it to be in incredibly bad taste to buy one of these and wear it for any other circumstance. These kimono were worn by people mourning the loss of someone very close to them, and the associations to the Japanese can be very negative. It’s becoming more common to see mofuku accessories (obiage, obijime) being worn with regular outfits, but the kimono itself is one of the items that I don’t think will ever escape the negative stigma. Mofuku kimono are always worn with solid black nagoya obi, black obiage and obijime, white haneri, white tabi, and black zori.
Hikizuri, also Susohiki
Hikizuri and susohiki actually refer to the way that the kimono is worn, it means basically “trailing skirt”. These kimono are worn by geisha, dancers, and other traditional stage performers. They can be nearly any of the styles listed above – komon, irotomesode, kurotomesode, etc. Maiko (apprentice geisha) wear furisode hikuzuri. Kakeshita, the wedding kimono mentioned above, are also technically hikizuri, and this is probably the only time an average woman will wear a kimono of this style. They are best purchased for collecting purposes or cosplay, not for wearing out to events.

*Thanks to Ichiroya for the permitted use of their images. Originally these items were all available for purchase and the images linked back to the sale listings, but they have been sold!!

Raden and Rhinestone obidome

I’m not sure who makes these particular raden (mother-of-pearl) obidome, but there’s a huge glut of them on eBay right now. Plenty of different shapes and styles, but all large pieces of mother-of-pearl decorated with Swarovski crystal accents. One seller has them up for Buy It Now prices of approximately $40, but another keeps putting them up as regular auctions with a starting bid of one cent. I bid on a few of them on a whim and got outbid, but since I wasn’t particularly attached I wasn’t upset when I lost. Then this beauty came up. To me, it looked like a moon. I wanted it. I needed it. I bid high, and won it for a whopping ninety-eight cents. The shipping was an impossible two dollars. What a bargain!

It adds the perfect amount of sparkle to an outfit, and even came in a fancy-schmancy black velvet box. Screw diamonds – rhinestones are a girl’s best friend 😉

I’ve already worn it once, with my crazy vintage outfit at the ToyCon.

Geta Makeover

Geta Makeover!

I purchased these geta a while back from my friend Amelie, because I’d been looking for a pair of slightly dressier geta I could wear with vintage or casual kimono. The straps were painfully tight and an akward shade of green velour that didn’t really go well with anything I owned.

Naomi sent me a wonderful box full of random goodies, and in it was this pair of gorgeous black pinstripe hanao. They’re wonderfully subtle and iki in my mind, and perfect for what I had in mind for the geta in the first place.

I’d lengthened the hanao on several of my pairs of zori before, so I figured I had enough experience to throw caution to the wind and go all Mad Scientist on the geta. There are a lot of images here, so I’ve made them smaller than usual. Click on them for larger sizes if you are curious 🙂


Phase 1: Lay the geta, bottoms-up, on a convenient flat clean surface.

Phase 2: Using a pair of small pliers (I used some sturdy jewelers pliers), pull the staple out from the flap under the toes and carefully undo the knotted cords.

Phase 3: Stripped geta bases with no hanao.

Phase 4: Insert the hanao back into the toe-hole, tie it around the metal pin, and carefully hammer the staple back into the rubber flap, making sure the cords are covered.

Phase 5: Thread the ends of the hanao into the back holes and tie the strings together in a tight knot and then tie the excess in repeated square knots around itself.

Repeat for the second geta, and voila, sexy and stylish new look.

While working on them, I noticed the black lacquer had chipped off one of the toes. This was simple to fix with a bottle of black nail polish.

And here I am wearing them with some delightfully obnoxious tabi!

Eventually I would like to replace the rubber soles on the bottom, and will share my adventures with that when the time comes. The whole process only took me about half an hour, and I think it was absolutely worthwhile. I now have a pair of well-fitting and stylish black geta, and the knowledge that I can totally do this again if I ever find another pair that’s not in fabulous shape. I hope seeing the procedure encourages you to try it as well if it’s something you were considering but were feeling overwhelmed by!

This is Hallowe’en, everybody make a scene!

I was invited to a party on October 30th this year, and I figured it was high time I broke out my Gothic Landscape houmongi. I’d originally wanted to wear it with my crow obi but I still haven’t had the opportunity to repair it. Oops! I figured in the spirit of all things Creepy and Spooky, I’d see about pairing it up with my spider obi instead. I’ve been hesitant about this combo since the kimono and the obi are so close in colour, but my salvation arrived in the mail on the Thursday before the party, in a boxful of shigoki obi. A splash of red was the perfect way to visually separate the two pieces as well as tie in the leaves on the obi. It also helped that one of the shigoki had tassels in the exact same shade as the glorious spiderweb haneri from Naomi.

I decided to further emphasize the spooky theme of the ensemble with accessories – I made myself a cute little hairband with black feathers, a raggedy purple “veil” and a sparkly little spider. I used some of the same tulle from the veil to make a big puffy bow to stick in my obi. Unfortunately, I spent nearly two hours in the car before I was able to get these photos, so my obi musubi has gotten sort of squished and lopsided 🙁

Having fun (after a few drinks) with some of the awesome decorations.

A close up of the amazing spider haneri

I even did my nails to suit the theme. Orange with black spiders and rhinestones! Again, I had fun wit the decorations for this pic

The party was a huge blast. Unfortunately, I had to get out of the kimono around 2 in the morning. I’d been drinking and going to the bathroom was starting to become a challenge! It also started snowing pretty profusely that night and I was worried about ruining my kimono on the way home.