
This article is part of a series on size challenges while collecting and dressing in kimono. Please read Part I
Part II – Tips and Tricks for Dressing
In the first entry of this series, I discussed the importance of buying what fits. However, when it comes to buying vintage, one-of-a-kind textiles, this is obviously not always an option. Sometimes a piece comes along that’s just so stunning that you have to have it, even if it’s not the best fit.
Thankfully, if you can’t make it, you can usually fake it. There are enough tools and tricks out there to help you achieve as smooth and clean a baseline as possible.
Problem 1 – Bosoms a’plenty
This is a problem I suffer from greatly, as do many of my kimono-wearing friends. They’re just not designed for someone with melons like these! The first, and most ideal solution for this is, is a kimono bra. They are available on sites like Rakuten or JShoppers. However, these are again made with smaller Japanese frames in mind, and if you’re as heavily-endowed as I am, it may be a challenge finding one that will fit.
Another solution is sarashi, a cotton binding cloth that is wrapped around the torso. These give a great smooth line from bust to hip while remaining breathable.
One suggestion I have heard of but not tried myself is a <url=”http://sites.google.com/site/binderreviews/resources”>Female-to-Male Transgender Binder Top. These are designed explicitly with the idea of flattening the bust as much as possible, for women making the transition to living as men. I imagine they would work well, as they are built for support and all-day comfort while supposedly remaining invisible. The only issue is that all the ones I have seen come up quite high in the back, which is counter-productive to having an elegantly low kimono collar. If anyone has tried this method, please let me know! I would love to hear from you!
The quickest method, and the one I used to use most often, is the rubber datejime/elastic brace method. This requires a fairly common kitsuke accessory, the rubberized “easy datejime”. I place one of these over my juban with a sports bra underneath. It serves to flatten and hold down my bust.

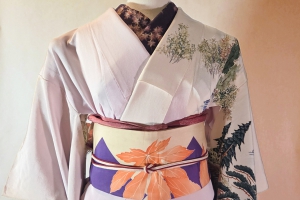
This solution works well enough, and here are a few outfits for comparison. The plaid ensemble on the left is using this easy method, whereas the flowered ensemble on the right is not – it’s ro, a sheer summer weave, and the fluorescent vivid green of my rubber datejime was way too visible! You can see how much smoother my bust is in the plaid outfit, compared to how it descends and curves over the front of the obi in the flowered one.


The main issue with this method is that the datejime can slip over the course of a long day. I’ve since replaced it with an elasticized velcro abdominal/back support, easily available at any medical supply. I simply wear it above the bust, and it functions almost exactly like sarashi, with the added benefit of extra back support.
Problem 2 – Baby Got Back
Thankfully I don’t have quite as much of a problem with this, but it’s still an issue. The kimono was not designed with hips or a bottom in mind. Once again, your best bet is to find one with a decent hip wrap. If that’s just not feasible, there is an easy and inexpensive way to make sure your kimono doesn’t flap wide open in the front, exposing you in a dramatic and embarrassing way. Simply take a kohrin(kohlin) belt and clip it to the outer flap of your nagajuban, wrap it around your knees, and clip it to the inner okumi panel of the kimono. If you don’t have a kohlin belt, a single suspender from the closet or the thrift store works just as well. Just be sure it’s got plastic grips on the teeth – metal ones might pull or tear vintage silk!
Problem 3 – Big Waist, Little Obi
Vintage obi. They’re beautiful, but they’re also almost always too short and too floppy to work with conveniently. Thankfully this is a problem that plagues the Japanese too, as pretty much everyone was smaller around the waist back then. There’s also the matter of kimono going out of fashion due to the difficulty of putting one on, which led to the development of plenty of tools to help dress.
One great such tool is the obidomekanagu, or obi clip. If you have an obi that’s too short to tie comfortably in a knot before tying your musubi, these are a tiny little pink godsend. Rather than tie the two ends together, you simply clip them together with this tool, nestled snugly in the small of your back, and tuck your obi-makura into the curve at the top. It holds everything into place, and gives you ten to fifteen centimetres of leeway.
Hopefully at least one tip here will help you be a little more comfortable and confident in your kimono! Please let me know what you’d like to see in the next entry of this series, or if you have any tips of your own.


 Bebe Taian
 CHOKO Blog
 Gion Kobu